Behind the curtain: Prestige
Intro
As someone who enjoys pushing the boundaries of what’s possible, I often find myself drawn to intriguing projects that offer a real challenge. Prestige, one of the top ghost clients in the Minecraft world, caught my eye for just that reason. Despite being cracked and deobfuscated in the past, I decided to take it on simply for the enjoyment of testing its limits. Known for its flawless customization, smooth performance, and undetectable modules like silent-aim and auto-crystal, Prestige continues to impress. While others have already peeled back its layers, my goal is to explore it from a fresh perspective—because sometimes it’s about the journey, not just the destination.
Analysis

With the necessary jars in hand, including the Prestige client itself, we can now begin. To do this, we’ll be using a tool called Recaf, a program that allows us to view the classes and analyze the bytecode within the jar. Upon opening the jar in Recaf, we immediately notice that it’s been obfuscated by ZKM, evidenced by the string ZKM21.0.0 appearing at the start of the constant pool.

Our first step in reversing Prestige’s security is to track down the authentication system. Knowing that the client uses a socket connection to authenticate with a server, we can start by searching for references to java/net/Socket within the jar. This will help us locate the class responsible for establishing connections. Once we identify the relevant class, we can begin analysing how it handles communication with the server and work our way through its security layers.!
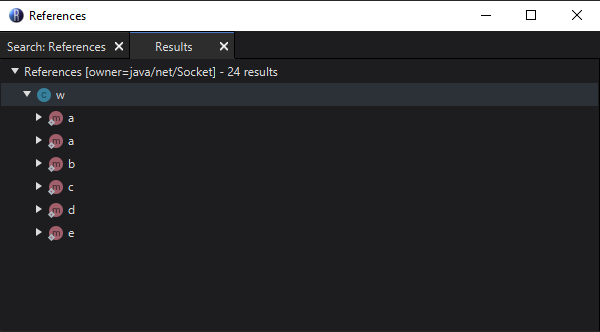
Upon searching for references to java/net/Socket we find that the only class containing these references is a class named w. This is amazing, as it indicates that w is likely the sole class responsible for connecting to the server. With this knowledge, our task becomes much more manageable since we no longer need to sift through multiple classes or track complex inter-class communication. Instead, we can zero in on understanding the logic and flow within this one class.
Key Observations and Guesses:
- Cryptographic Operations:
Methods like
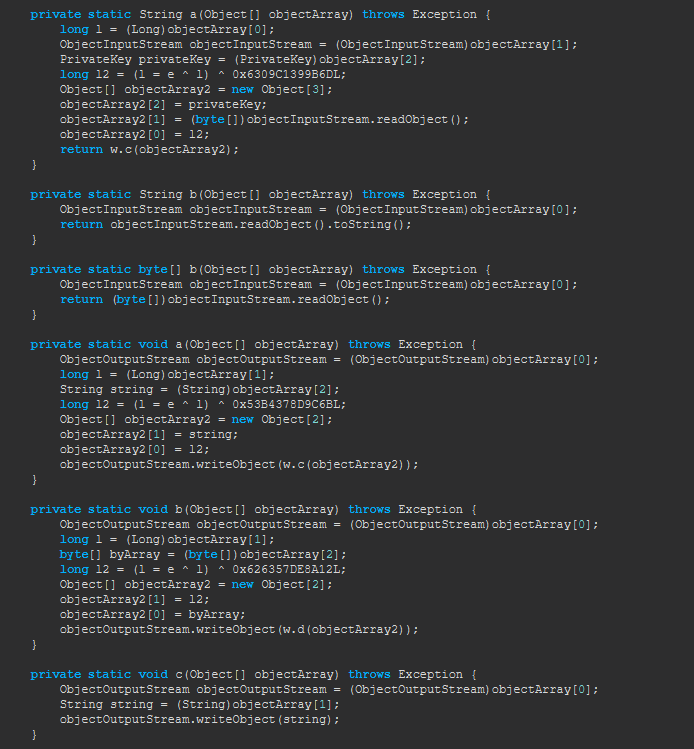
a(Object[]),b(Object[]), andc(Object[])seem to handle encryption and decryption using cryptographic ciphers (Cipher.getInstance). These methods likely encrypt or decrypt data using keys generated byKeyPairGenerator.The use of
PrivateKeyandPublicKeysuggests asymmetric encryption, where data is encrypted with a public key and decrypted with a private key.
- Socket Communication:
- Methods such as
a(Object[]),b(Object[]), andc(Object[])involveSocket,ObjectOutputStream, andObjectInputStream, indicating that the class communicates over a network. It likely sends and receives encrypted data or commands.
These methods appear to handle the encryption and decryption of data for communication, both ways—encrypting outgoing data and decrypting incoming data. However, since the encryption and decryption logic is not directly inlined into the code but rather encapsulated within these methods, we may have an opportunity to bypass the security altogether. By modifying these methods to simply return plain strings or unencrypted data, we could effectively disable the encryption and decryption process, allowing us to bypass this layer of security without needing to interact with the actual cryptographic logic. This means we wouldnt have to replicate the encryption when we come to make our server emulator.
Reversing the Server
Intercepting the connection
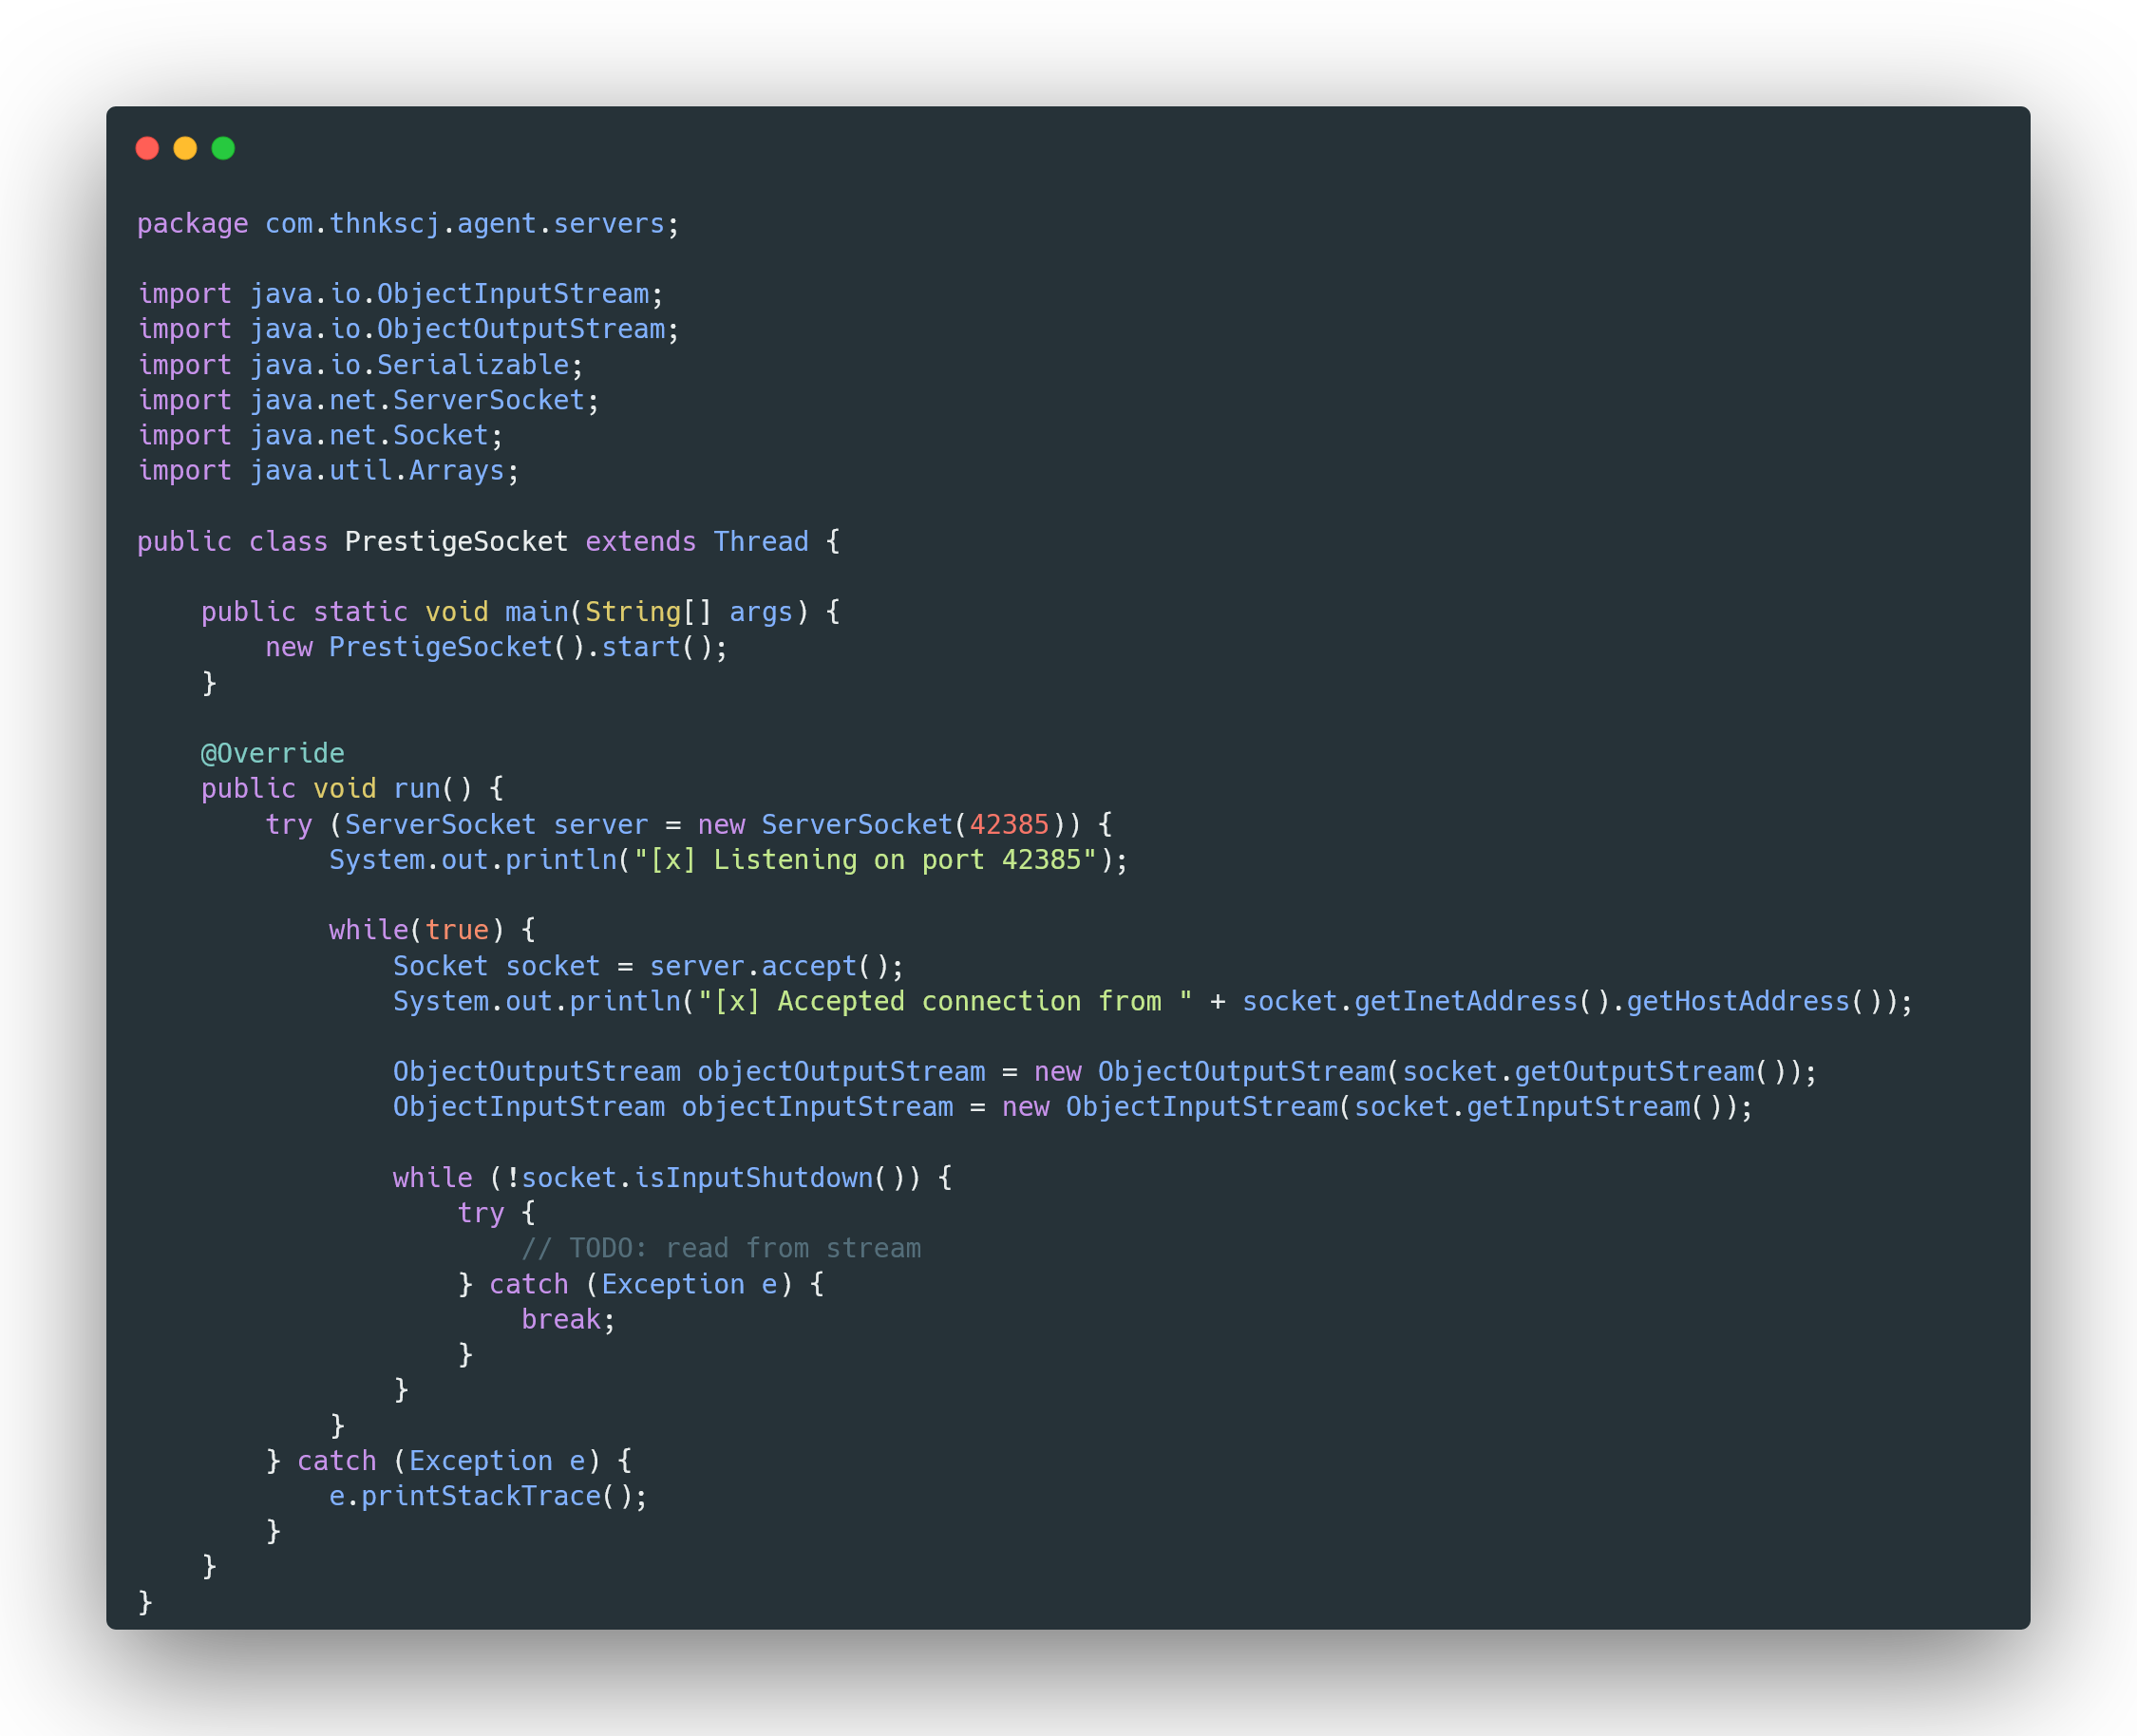
To create the socket server for our server emulator, we’ll use a ServerSocket that listens for incoming connections on a specific port—in this case, port 42385. First, we start the server by initializing it within a separate thread using the PrestigeSocket class. This thread runs continuously, waiting for client connections. When a client connects, the server accepts the connection, prints the client’s IP address, and sets up input/output streams using ObjectInputStream and ObjectOutputStream. These streams allow us to simulate communication as if we were the real server. We now need to trick the client into connecting to our server instead of the actual prestige server.
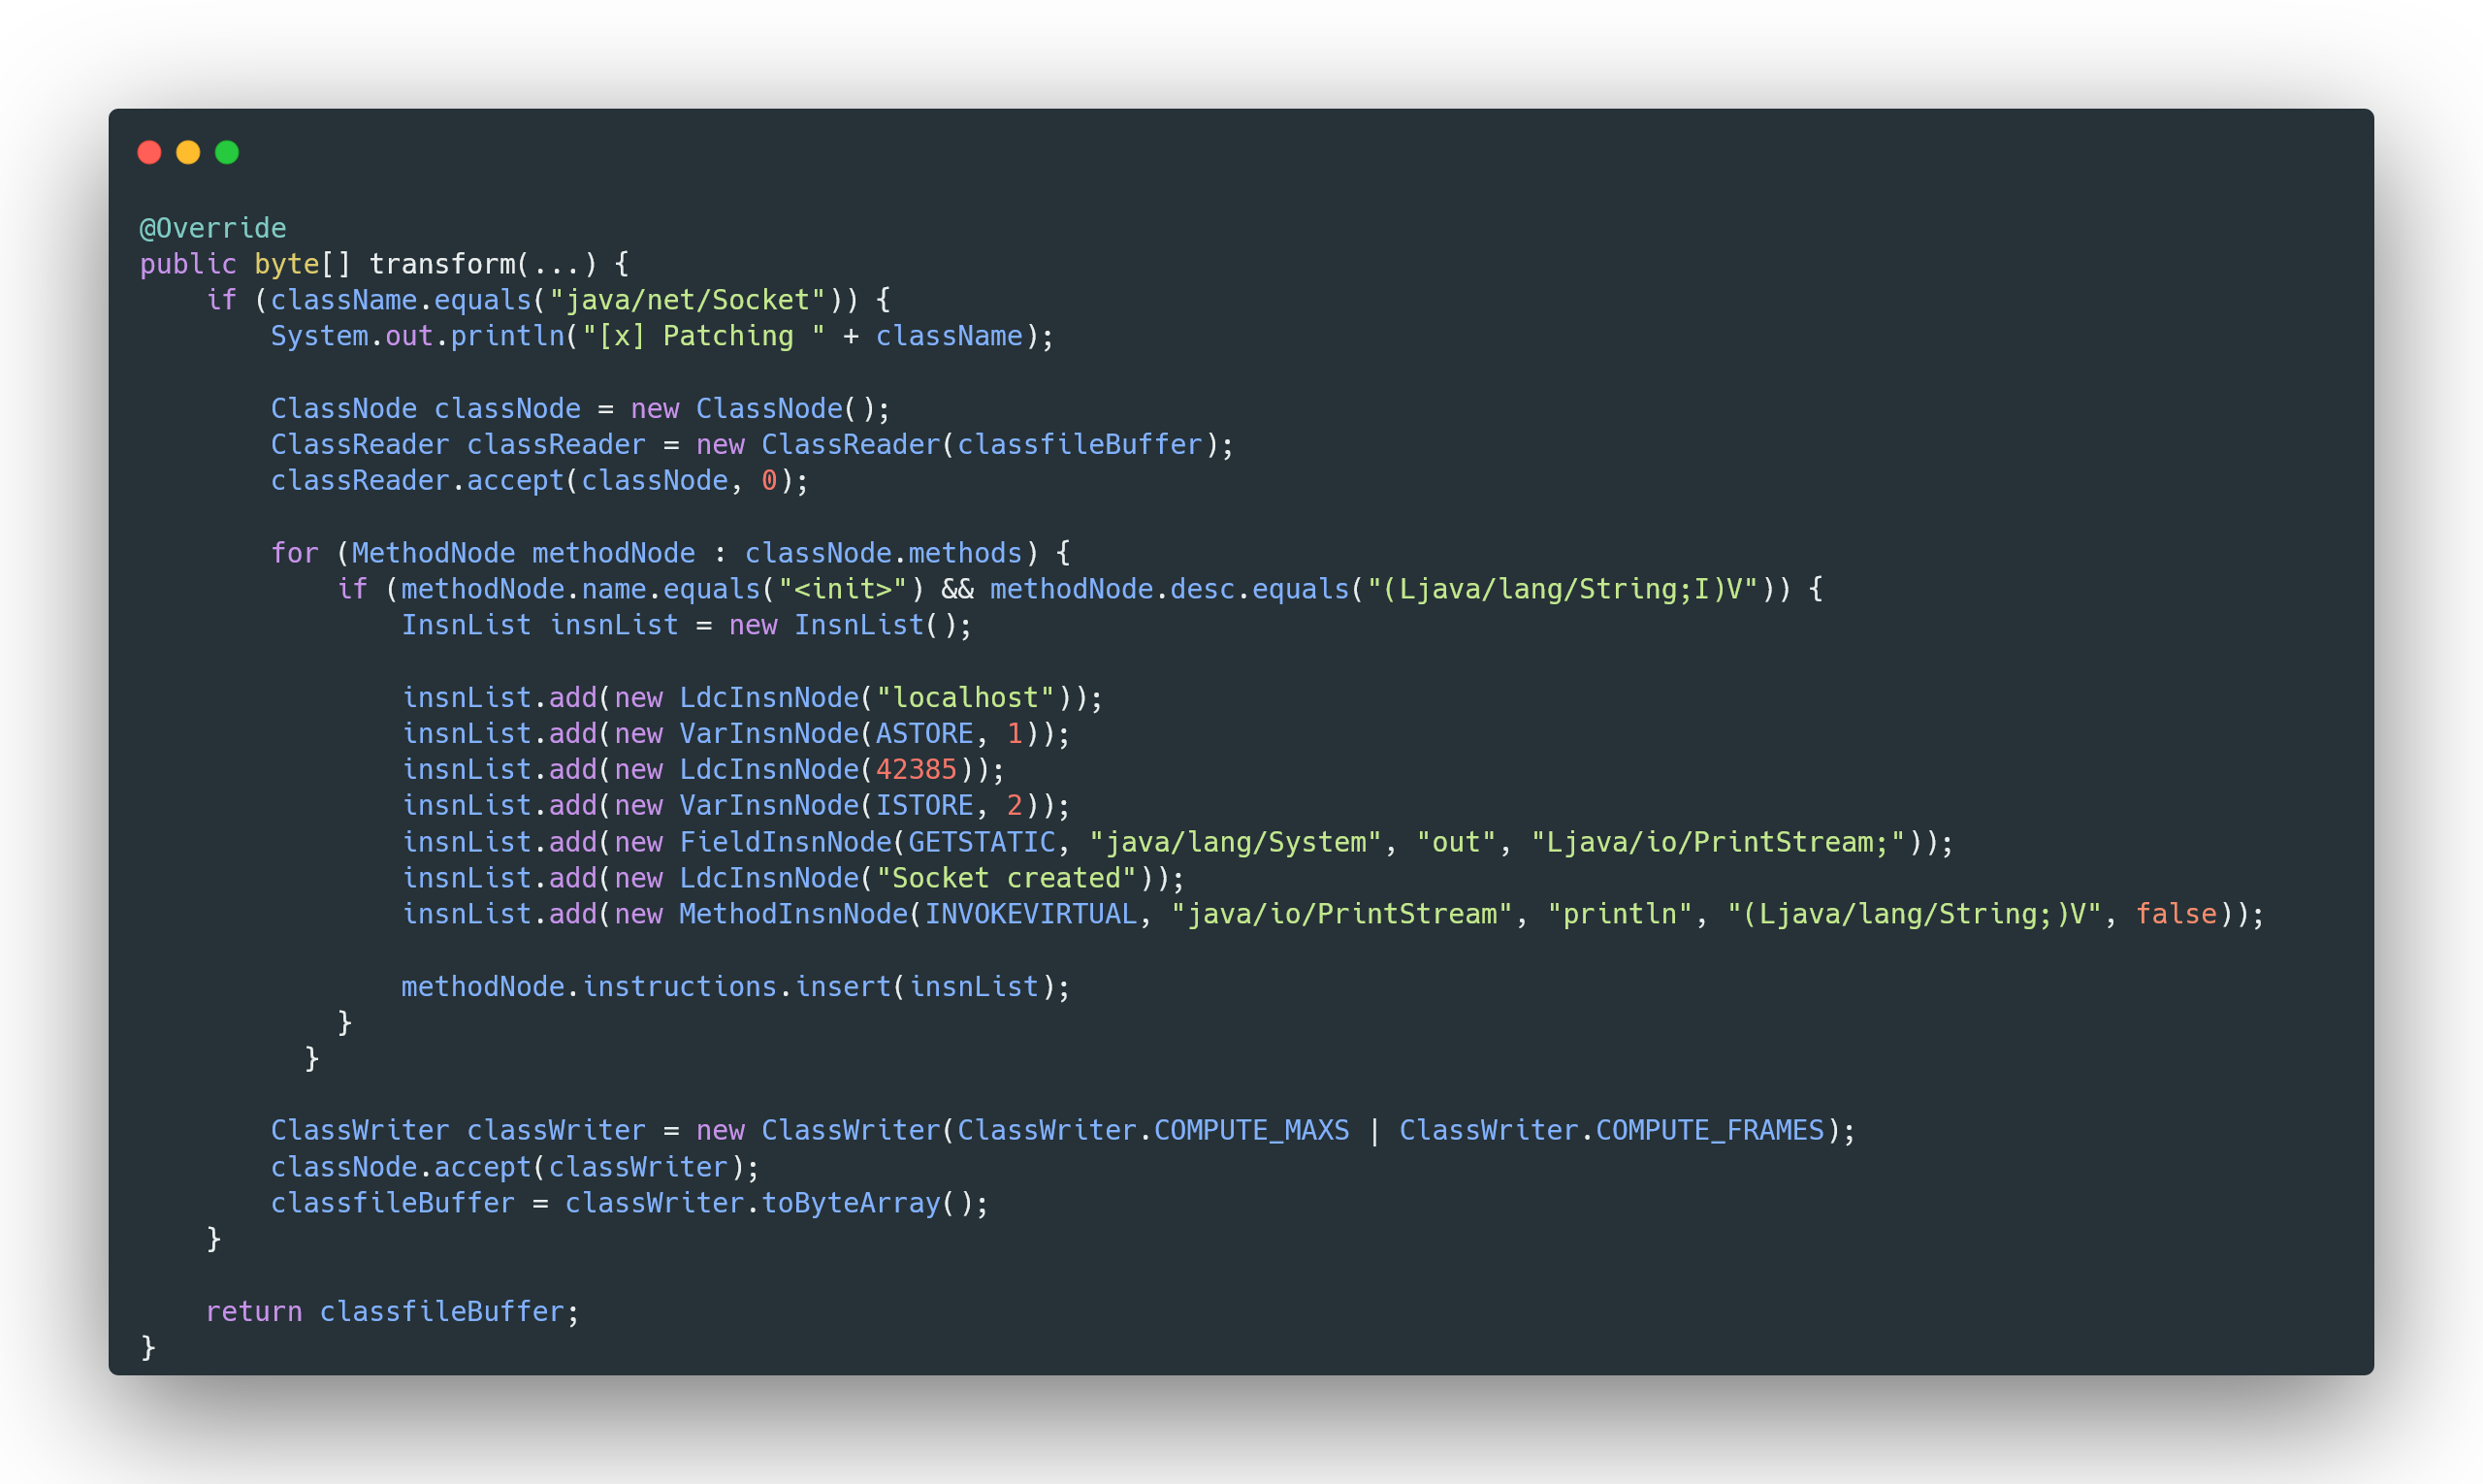
This transformer modifies the Socket class in Java to trick the application into connecting to our local server emulator instead of the original Prestige server. When the Socket class constructor is called with a hostname and port (specifically the Socket(String host, int port) constructor), this transformer intercepts the call. It replaces the hostname with localhost and the port with 42385, which is the port where our server emulator is running. Additionally, it prints a message to the console indicating that the socket was created (For debug purposes). By injecting these instructions, java is forced to connect to our local server rather than the original one, allowing us to intercept and analyze the communication.
Now that we’ve set up our server emulator and applied the transformer to redirect the socket connections, we can start our server by running the PrestigeSocket class, which will listen on port 42385. Once the server is up and running, we can launch the client application with our transformer applied. To start we are just going to read as much as we can before the socket disconnects.
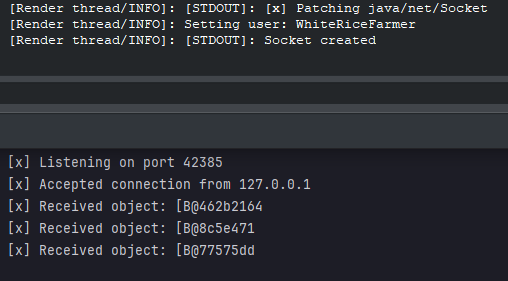 We now know that our emulated server works as the client connects to it, however only we received the following objects:
 [B@462b2164, [B@8c5e471, and [B@77575dd. These are byte arrays that the client is sending, but since the client hangs indefinitely after sending them (likely waiting for a response from the server), it suggests the client is expecting an response. To understand what data is being sent, we need to modify the client further by replacing the encryption and decryption methods with ones that simply return the data passed to them. By bypassing the encryption, we can capture and analyse the actual data being transmitted, which will help us move forward in emulating the server’s behaviour more effectively.
Removing encryption
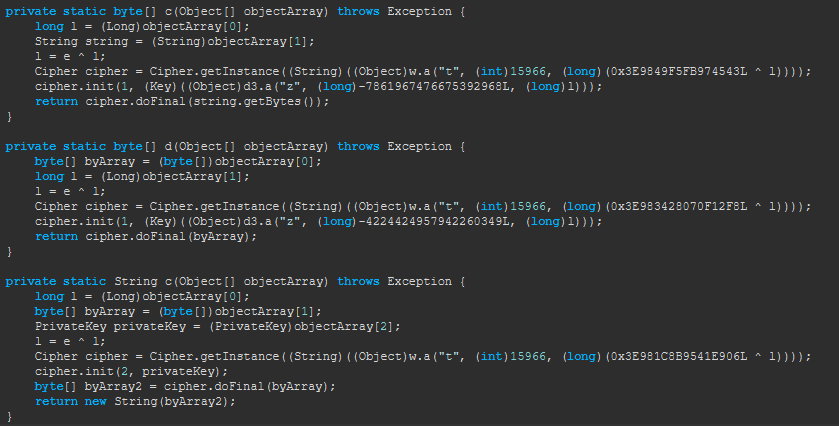
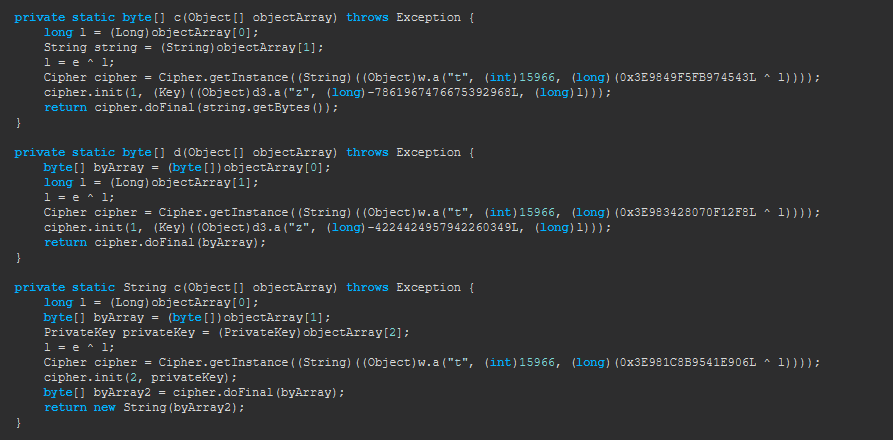
These methods are responsible for encrypting and decrypting data. We will replace these methods with simplified versions to bypass the encryption process and have all data sent in plain text.
The original private static byte[] c(Object[] objectArray) method, will be replaced with:
1
2
3
long l = (Long)objectArray[0];
String string = (String) objectArray[1];
return string.getBytes();
Similarly, the original private static byte[] d(Object[] objectArray) method, will be replaced with:
1
2
3
long l = (Long) objectArray[1];
byte[] byArray = (byte[]) objectArray[0];
return byArray;
Finally, the original private static String c(Object[] objectArray) method, will be replaced with:
1
2
3
long l = (Long)objectArray[0];
byte[] byArray = (byte[])objectArray[1];
return new String(byArray);
With these changes, we can now see the raw data being sent between the client and server, which will help in understanding the communication flow and further reverse-engineering the logic. 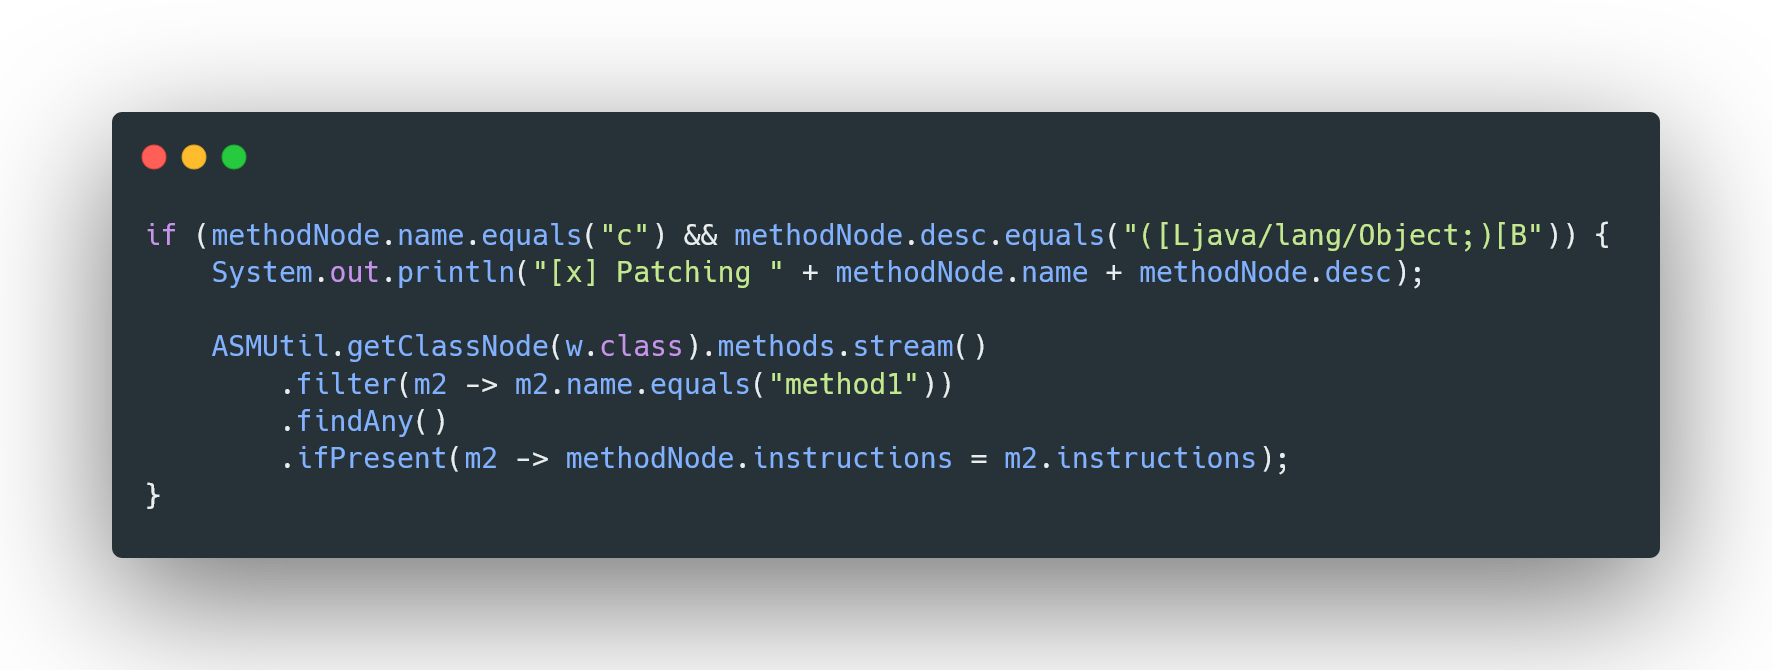 This is how we plan to replace the method bytecode and remove the encryption/decryption logic. Specifically, we’re targeting the method named
 c with the descriptor ([Ljava/lang/Object;)[B.
Instead of manually creating the ASM instructions for this method, we’re going to use the class w as a template. By accessing ASMUtil.getClassNode(w.class), we can easily locate a method, such as "method1", within the w class. Once we find it, we’ll simply take the instructions from method1 and apply them to the target method c. This approach allows us to write our logic in regular Java, leveraging the structure of the existing method, and eliminates the need for manually crafting complicated ASM bytecode. In short, it simplifies the whole process and makes it much more manageable.
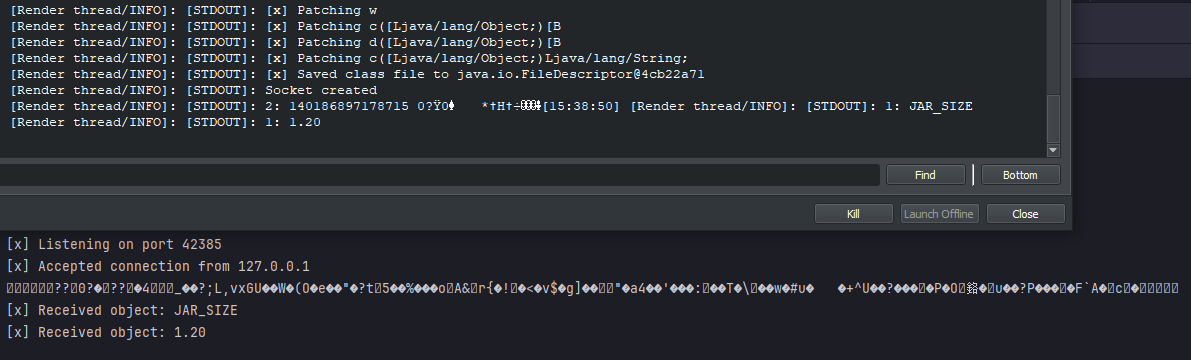
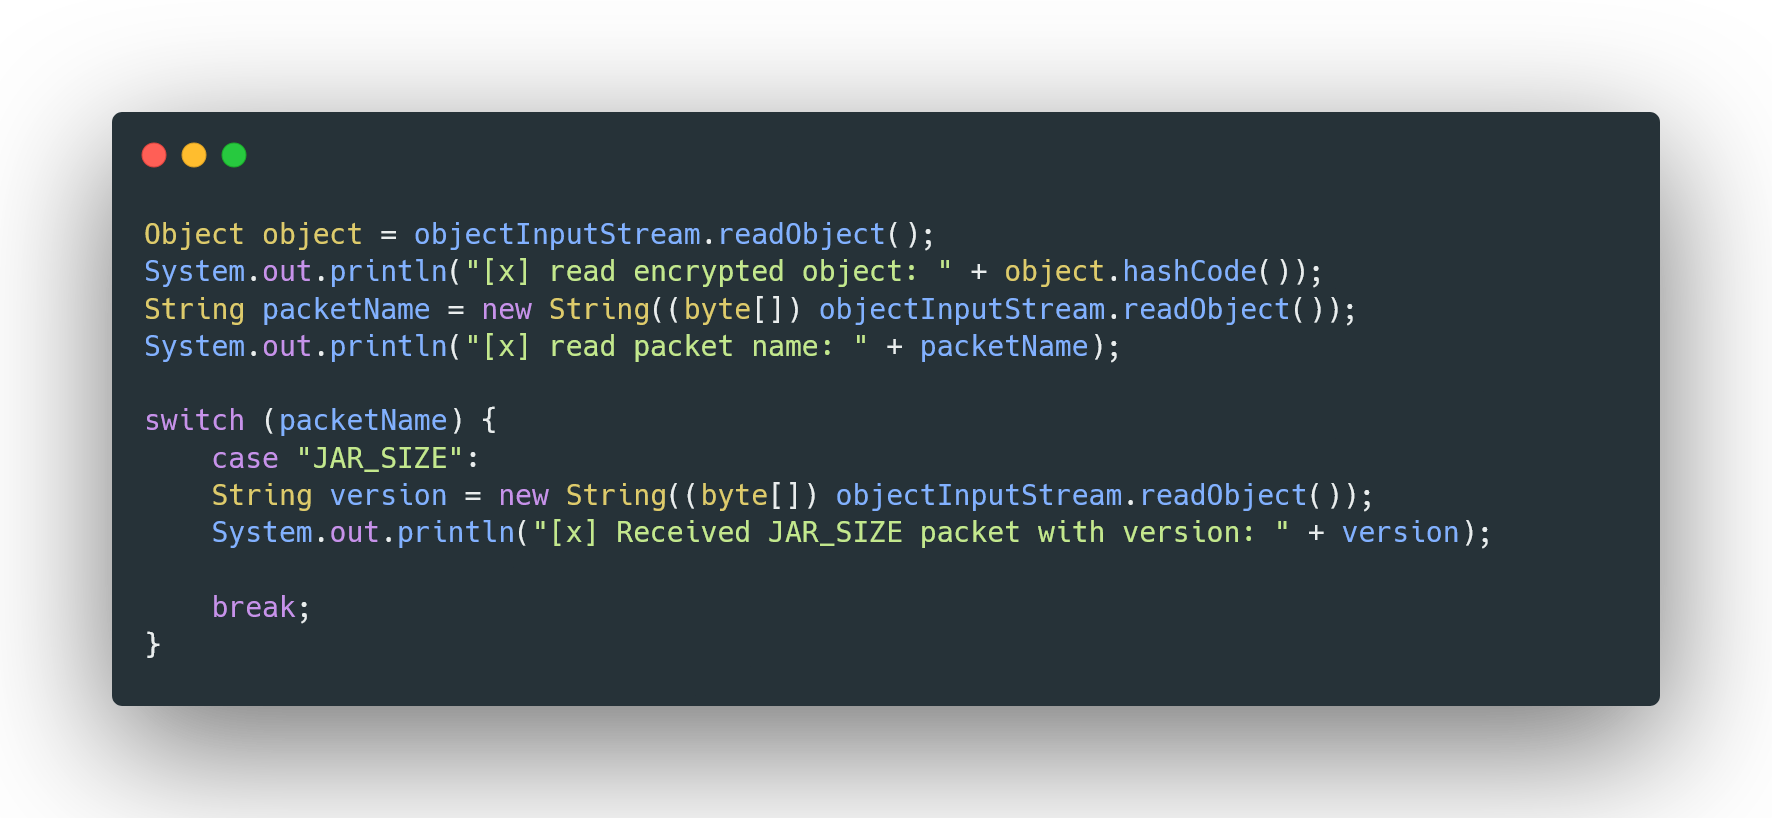
This is the response I received, and it’s clear that the strange Unicode characters were originally part of the encryption process, likely representing a key or some other data needed to decrypt the subsequent information. Since we’ve removed the encryption and decryption logic, this data is no longer relevant and can simply be discarded. The important parts of the response are JAR_SIZE and 1.20, which appear to be the significant information we need. JAR_SIZE likely represents the name of the packet, while 1.20 seems to be an argument passed to the server, possibly to request the jar size for that specific version. The next step will involve connecting to the real server, dumping the responses, and implementing them into our socket server to simulate the server behavior. But first lets add the packet we have to our emulator.
 Now, let’s connect to the real server and intercept the packets it sends and receives. By doing this, we can piece together the necessary information and determine what we need to implement in our emulator, allowing us to move forward with the project.
Dumping the packets
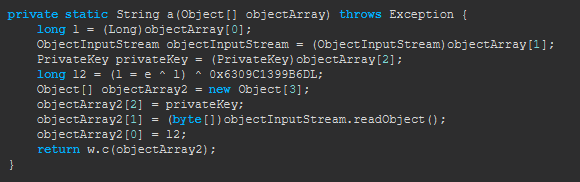
The following method, a(Object[] objectArray), appears to be responsible for decrypting data before returning it to the client. To better understand what is being decrypted, we can modify the bytecode for this method. Specifically, we want to remove the existing return statement and instead insert a System.out.println to print out the decrypted response. After printing, we can return the decrypted result to the client as usual. This will help us see exactly what data is being sent, allowing us to confirm the contents of the decryption and make it easier to emulate the server responses in our project. We’ll replace the return statement with a print statement and then return the result as normal.
Modified Method:
1
2
3
4
5
6
7
8
9
10
11
12
13
14
15
private static String a(Object[] objectArray) throws Exception {
    long l = (Long)objectArray[0];
    ObjectInputStream objectInputStream = (ObjectInputStream)objectArray[1];
    PrivateKey privateKey = (PrivateKey)objectArray[2];
    long l2 = (l = e ^ l) ^ 0x6309C1399B6DL;
    Object[] objectArray2 = new Object[3];
    objectArray2[2] = privateKey;
    objectArray2[1] = (byte[])objectInputStream.readObject();
    objectArray2[0] = l2;
    String string = w.c(objectArray2);
    System.out.print((Object)"[server]: ");
    System.out.print((Object)string);
    System.out.print((Object)"\n");
    return string;
}
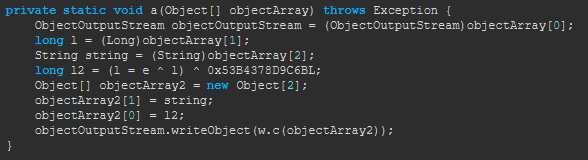
The method a(Object[] objectArray) is responsible for encrypting data before sending it to the server. To understand what is being encrypted, we can modify the bytecode to print the data before it is encrypted. Specifically, we’ll insert a System.out.println before the encryption step to display the raw data.
1
2
3
4
5
6
7
8
9
10
11
12
13
14
[client]: JAR_SIZE
[client]: 1.20

[server]: false
[server]: 1420196

[client]: HWID_LOGIN
[client]: 4274d357553fc..................................21a69f0515db1cb9

[server]: true
[server]: username
[server]: username@gmail.com
[server]: b514a6f831cd8e.................................1d393e59bbcd772b
[server]: Successfully processed HWID!
This is the response we received after intercepting the communication between the client and the real server. We can clearly see the JAR_SIZE packet we previously identified, followed by the actual size returned by the server, which is 1420196. This confirms that the strange values we initially saw were indeed part of the encryption. Now that we have the real value from the server, we can replicate it within our emulator to simulate the correct behavior when handling the JAR_SIZE packet. Additionally, the interaction shows a hardware ID (HWID) login process, which returns the client’s credentials and a final success message. With this, we have all the necessary pieces to start implementing these responses into our server emulator.
After successfully connecting to the real server and dumping all the packets I could intercept, I compiled a list of them with details on what each packet sends and receives. Below is an explanation of the key packets I encountered:
- JAR_SIZE:
- Client sends:
version(String): The version of the JAR file (e.g., “1.20”).
- Server responds:
updateNeeded(boolean): Likely indicates if an update is needed (e.g.,false).jarSize(int): The actual size of the JAR file in bytes (e.g.,1407492).
- Client sends:
- LOGIN:
- Client sends:
username(String): The user’s username.password(String): The user’s password.hwid(String): The hardware ID of the client device.
- Server responds:
loginSuccess(boolean): Indicates if login was successful (e.g.,true).username(String): The confirmed username.email(String): The user’s email address.key(String): Some form of key or identifier.message(String): Success message (e.g., “Successfully processed login!”).
- Client sends:
- HWID_LOGIN:
- Client sends:
hwid(String): The hardware ID for login.
- Server responds:
loginSuccess(boolean): Indicates if login was successful (e.g.,true).username(String): The confirmed username.email(String): The user’s email address.key(String): Some form of key or identifier.message(String): Success message (e.g., “Successfully processed HWID!”).
- Client sends:
- CONFIG_GET:
- Client sends:
username(String): The username requesting the configuration data.
- Server responds:
configItemCount(int): The number of configuration items available.configItems(List): A list of each configuration item.
- Client sends:
- CONFIG_DELETE:
- Client sends:
configName(String): The name of the configuration to be deleted.description(String): The description of the configuration.visibility(String): The visibility status of the configuration.
- Server responds:
configItemCount(int): The number of configuration items.message(String): Message indicating failure (e.g., “can’t delete configs retard”).configItems(List): The remaining configuration items.
- Client sends:
- CONFIG_CREATE:
- Client sends:
configName(String): The name of the new configuration.description(String): The description of the new configuration.visibility(String): The visibility status of the new configuration.
- Server responds:
configItemCount(int): The number of configuration items.message(String): Message indicating failure (e.g., “can’t create configs retard”).configItems(List): The existing configuration items.
- Client sends:
- CONFIG_DATA:
- Client sends:
configName(String): The name of the configuration for which data is being requested.
- Server responds:
configData(String): The actual data of the configuration.
- Client sends:
Each packet gives us insights into how the client and server communicate, and now that we have these details, we can replicate these interactions in our emulator to ensure proper functionality.
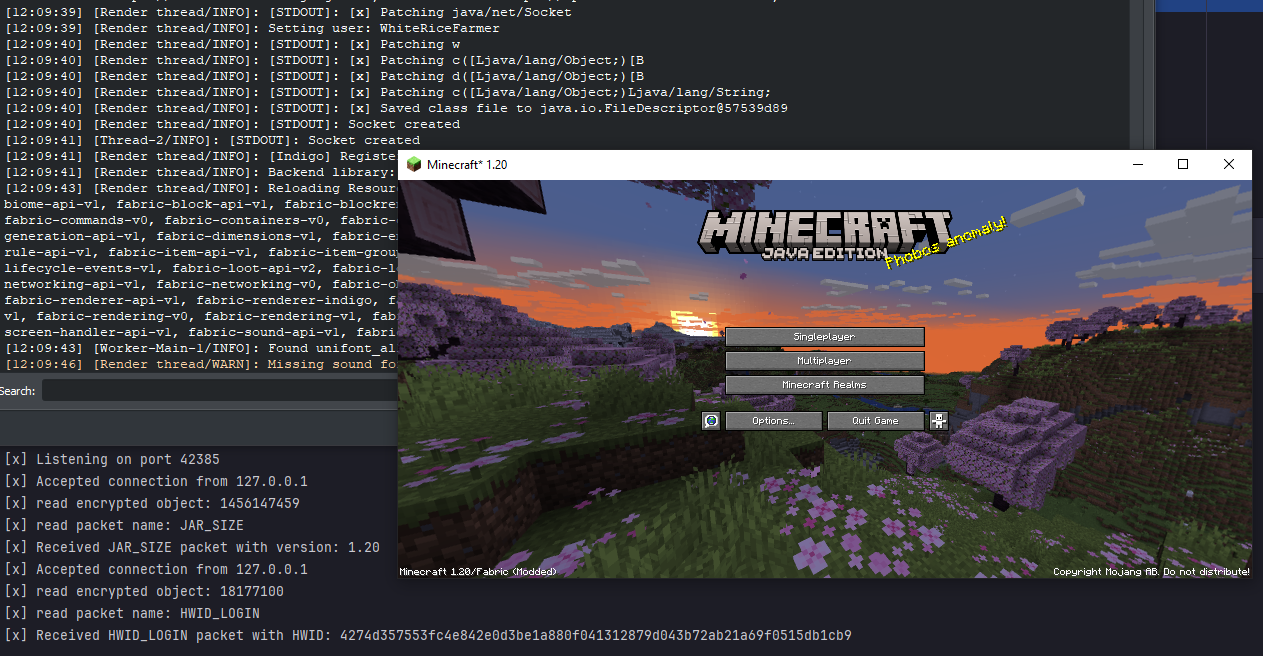
After implementing the necessary packets into our emulator, we’ve successfully managed to crack the server communication. By hooking the bytecode with the following transformers:
1
2
inst.addTransformer(new ChangeSocketHost());
inst.addTransformer(new RemoveEncryption());
we intercepted and decoded the encrypted data sent between the client and server. As a result, we’ve replicated the entire process within our emulator. Below is a screenshot demonstrating the final cracked state, showing how the server now accepts our packets seamlessly.
Conclusion
Cracking this client was both a challenging and rewarding experience. I had a lot of fun digging into the code, intercepting packets, and ultimately piecing together how everything works. Writing about the process helped me solidify my understanding and share the steps with others. However, I want to make it clear that this project was done with full permission from the owner, who even provided me with an account to help dump the responses from the server. There were no ill intentions involved—this was purely a learning exercise, done ethically, and with the consent of all parties. If you have any questions feel free to ask me on discord thnkscj or email me at me@cjstevenson.com